

Window tinting can make your car look sleek and stylish, while also protecting it from the sun’s harmful UV rays. It helps to reduce heat inside the car, keep the interior cooler, and protect the upholstery from fading. It also improves privacy and reduces glare while driving. If you’ve ever wondered how to apply window tint to your car yourself, this guide will walk you through it step by step.
Why Should You Tint Your Car Windows?
Before diving into the process, it’s important to understand the reasons behind car window tinting. There are several benefits to having tinted windows:
- UV Protection: Tinted windows block harmful UV rays and ultimately protect your skin and the interior of your car. Because over time, UV rays can make your car’s seats and dashboard crack and fade.
- Heat Reduction: Tinted windows reduce the amount of heat inside your car. So you could feel more comfortable on hot summer days in your ride.
- Privacy: Darker windows give you more privacy and make it harder for people to see inside your car.
- Glare Reduction: Window tint helps reduce the glare from the sun and the headlights of other cars, making it easier to drive.
Materials and Tools You’ll Need
To successfully apply window tint, you’ll need a few materials and tools. Make sure you have everything ready before you start so the process goes smoothly and doesn’t take too long. If you’re wondering how long it takes to tint car windows, we’ve covered that in detail here.
- Window Tint Film: Choose a tint film that suits your needs. There are different types, including dyed, ceramic, and metalized films. Ceramic films offer the best heat and UV protection.
- Squeegee: A squeegee is used to smooth out the tint film and remove any air bubbles. It’s an essential tool for a smooth and even application.
- Razor Blade or Utility Knife: You’ll need this to trim the excess tint film to fit your car windows perfectly.
- Spray Bottle with Water and Soap: A simple mixture of water and a few drops of dish soap helps wet the window for easier application of the tint film.
- Microfiber Cloths: Use these to clean the windows before applying the tint and for wiping off any excess solution during the process.
- Measuring Tape: Use measuring tape to measure the right size and cut the tint film accordingly.
- Heat Gun or Hair Dryer (Optional): Some tints need a little heat to conform to the curves of the window. A heat gun and hair dryer can help with this.
Step-by-Step Guide to Applying Window Tint
Now that you have all your materials, let’s dive into the step-by-step process of applying window tint to your car windows. And if you ever need to take it off, here’s our guide on how to remove tint from car windows.
Step 1: Clean Your Car Windows Thoroughly
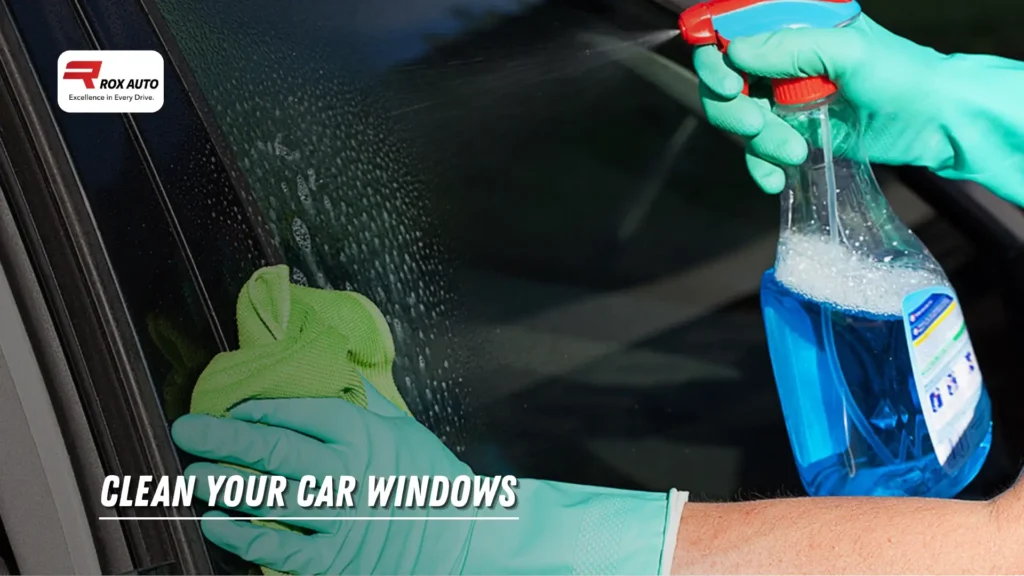
Before you start applying the tint, the first thing you need to do is clean the windows. Any dirt, dust, or grease left on the window will cause air bubbles and wrinkles in the tint film. This step is important to get the best final results.
Spray a mixture of water and dish soap onto the windows and wipe them down with a microfiber cloth. Make sure to clean all edges and corners. If your windows are really dirty, you should repeat this process. The cleaner the window, the better the tint will adhere.
Step 2: Measure and Cut the Tint Film
Once your windows are clean and dry, it’s time to measure and cut the tint film. Use a measuring tape to determine the size of your car window. Add a couple of extra inches to the width and height to make sure you have enough film to cover the entire window.
Next, use your scissors or you can use a utility knife to cut the tint film to the correct size. It’s better to cut the film a little larger than needed, as you can always trim off the excess after it’s applied.
Step 3: Wet the Window
To make the application easier, you’ll need to wet the window with your soapy water mixture. Spray the entire window, covering it evenly. It allows the tint film to slide into place without sticking immediately, so you have time to adjust it.
A light spray would be enough to avoid soaking the window too much. The water will also prevent the tint from sticking to the window and allow you to reposition it if needed.
Step 4: Apply the Tint Film to the Window
Now, take the tint film and carefully peel off the backing. Be careful not to let the sticky side touch anything, because it is prone to dirt and damage. Once the backing is removed, carefully place the tint film onto the wet window. You should start from one edge.
Make sure the film is positioned properly while you leave a little bit of extra film on all sides. You can use the spray bottle to keep the film wet as you adjust it. You can take your time to get the film aligned correctly. Don’t rush on this step because it can lead to poor quality.
Step 5: Smooth Out Air Bubbles
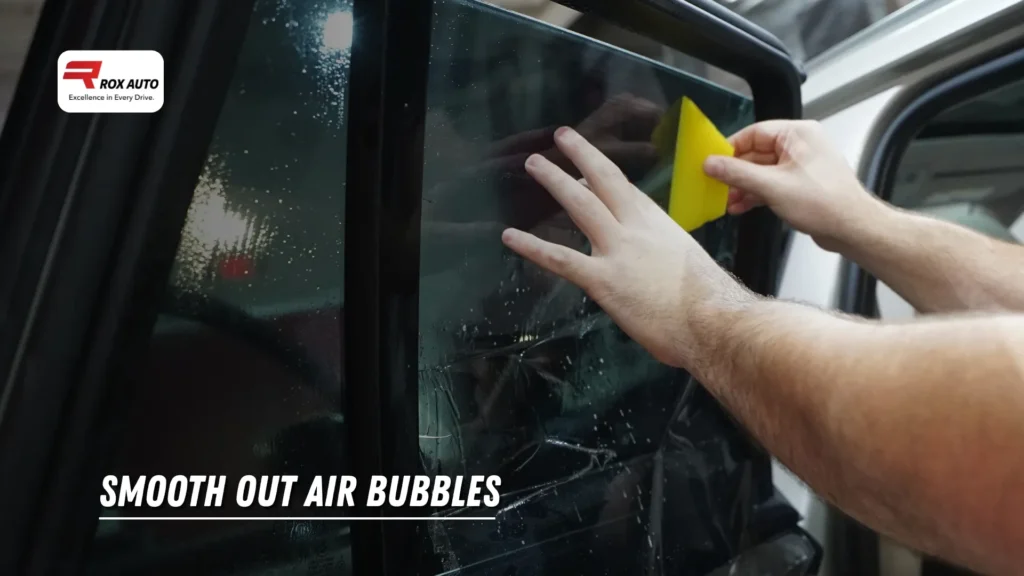
Once the tint film is in place, it’s time to smooth out any air bubbles. Use a squeegee to gently push the bubbles from the center of the window towards the edges. It will remove the air and ensure the film sticks properly.
Be gentle with the squeegee, especially around the edges, to avoid damaging the tint film. If you notice any stubborn bubbles, use a pin to puncture the bubble and then push the air out with the squeegee.
Step 6: Trim the Excess Film
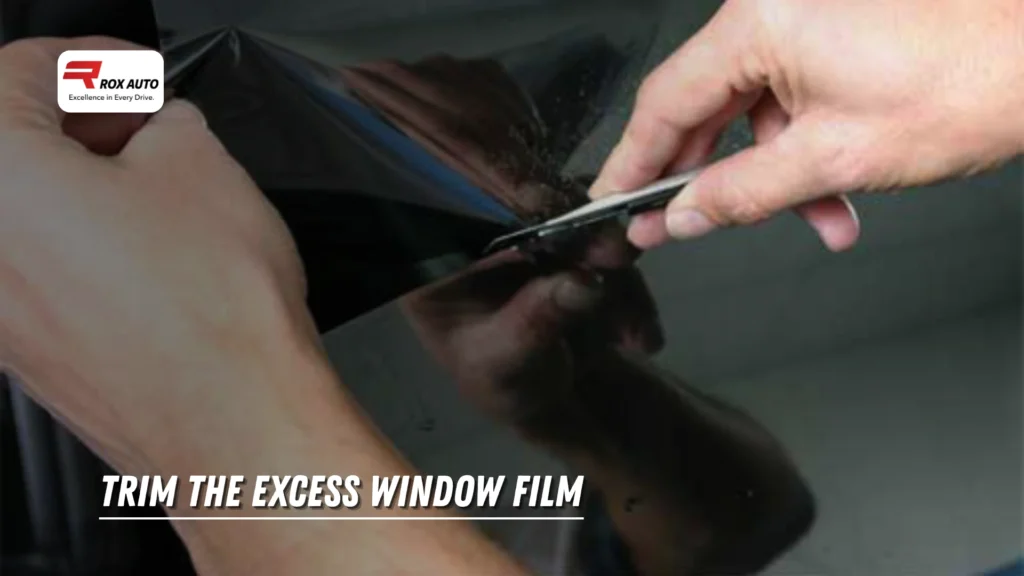
After the tint film is smoothed out and free of bubbles, it’s time to trim the excess film. Use a razor blade to cut along the edges of the window carefully. Be sure to cut neatly, leaving a small amount of extra film to ensure a clean edge.
Take your time with this step to ensure the trim is even all around the window. You can also use the squeegee to press the edges down as you cut to make sure the film stays in place.
Step 7: Heat the Tint (Optional)
This step is optional, but it can help the tint film stick better and conform to the shape of the window. If your car has curved windows, use a heat gun or hair dryer to warm up the tint film.
Hold the heat source a few inches away from the tint and move it back and forth. Don’t overheat the film, as this could cause it to bubble and peel. The heat will help the tint film mold to the window and stay in place more securely.
Step 8: Clean and Inspect the Window
Once the tint is applied, use a microfiber cloth to clean off any remaining water and soap solution. Check the window for any bubbles, wrinkles, and uneven areas. If everything looks good, let the film cure for at least 24-48 hours before rolling the windows down.
Common Mistakes to Avoid
Even though applying window tint is a manageable DIY project, there are a few mistakes to avoid:
- Not cleaning the window properly: Any dust or dirt left on the window can cause bubbles and wrinkles in the tint film.
- Over-wetting the window: Too much water can cause the film to slide too much and leave water spots behind.
- Rushing the application: Tinting windows takes time. Rushing the process can lead to mistakes and an uneven finish.
- Using the wrong tint film: Make sure you choose the right tint for your needs. Different films offer different levels of UV protection, heat rejection, and privacy.
Prefer Professional Tinting? Let Rox Auto Handle It
If you’re unsure about tinting your car windows yourself, trust the experts at Rox Auto. Our skilled team ensures flawless application with high-quality materials, offering the best UV protection, privacy, and heat reduction.
Why Choose Rox Auto?
- Expert tinting with years of experience
- Top-quality materials for long-lasting results
- Quick and efficient service with satisfaction guaranteed
Contact Rox Auto today to schedule your window tinting service and enjoy a cooler, stylish ride.
Conclusion
Applying window tint to your car can seem like a daunting task. However, if you have the right tools and techniques, then you can do it yourself. You can benefit from our step-by-step guide on how to apply window tint to your car. But make sure you avoid the common mistakes to get the best results out of it.
Frequently Asked Questions
1. How long does it take for a car window tint to cure fully?
After applying window tint to your car, it typically takes about 24 to 48 hours for the tint to cure fully. During this time, it’s essential to avoid rolling down your windows, as the tint needs time to bond properly to the glass. If you’re in a humid environment, the curing time may be longer.
2. Can I tint the windows on my car myself, or should I hire a professional?
Yes, you can do it yourself if you have the right tools. No doubt, it’s a tricky task and can be daunting for large and curvy windows. In case you are looking for a flawless finish, then it would be better to hire a professional to get high-quality results.
3. Will window tint affect my car’s visibility at night?
No, the right amount of tint will not significantly affect your visibility at night. However, if you go for a very dark tint (too high a percentage of darkness), it may slightly reduce visibility, especially in low-light conditions. It’s important to check the legal tinting limits in your area, as regulations exist to ensure that your windows are not too dark to drive safely.
4. How can I fix bubbles in my car’s window tint after it has been applied?
If you notice bubbles in your window tint after applying it, don’t worry. You can fix them by gently using a squeegee to push the air towards the edges. If the bubbles are stubborn, use a pin to puncture the bubble carefully and then smooth it out. If the bubbles remain, it’s possible that the tint wasn’t applied smoothly enough, and you may need to reapply or visit a professional for a touch-up carefully.
